
Paint Washed Box


Hello Friends

I  am just popping on to show you my lovely upcycled box that I painted this morning. I bought this wooden box from the thrift store for $2 and gave it a make over.  Well correction my husband bought it. He accidentaly broke my other wooden box that stored all of my essential oils. He did promise to get me a new one. Now I don't know if you know anything about essential oil storage but they are expensive. I think my last one was around $40.  So when I when I saw this at the thrift store I grabbed it. My husband was happy to pay for it at $2 ha!  It looks handmade it has some nicks and imperfections on it but it all adds to the character and I was going to distress it anyway.


I made a paint wash using Robin Egg blue acrylic paint and water. Thin the paint out until it is quite runny when you paint with it the wood texture still shows through. It left a nice wash and the knots of the wood were still noticeable.  When it was completely dry I stamped all over the box with this lovely stamp called Floral Soul from Unity. I used Peacock Feathers distress ink on top of the paint. When the ink was dry I went around the edges of the box with a white paint wash. Once the white paint was dry I took some steel wool and distressed the edges taking some of the paint back off.  Finally I stamped the beautiful soul stamp with Versamark Ink and heat embossed it with white embossing powder.


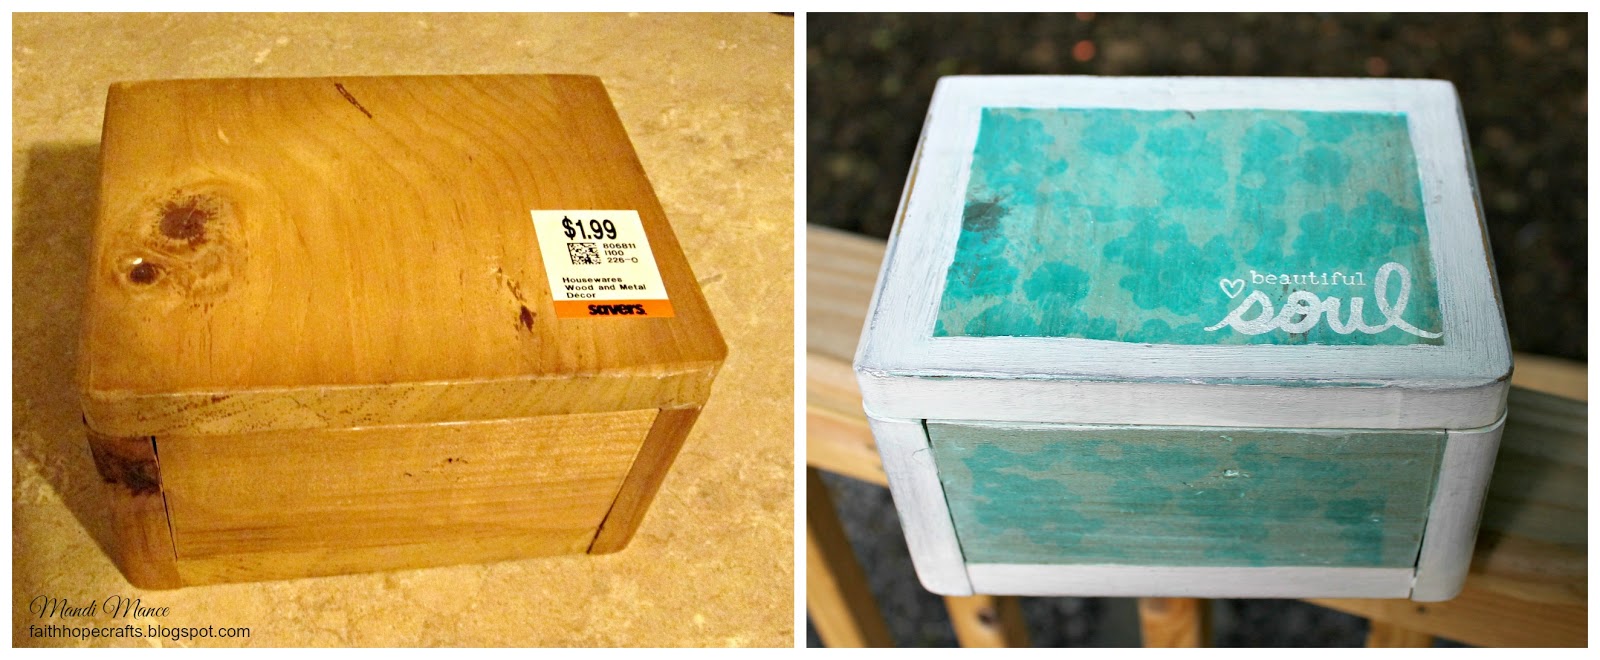
Here it is side by side with the before and after. I absolutely love it and it is so much nicer than the last one I had and it was a fraction of the price.

Thanks so much for stopping by my blog today.


Mandi xox

Linking my box up with Friends With Flair

Comments

  1. Great thrift store find (I love the thrift store!) and I love how it turned out!

    ReplyDelete
  2. Beautiful project! You are always so creative. <3

    ReplyDelete
    Replies
    1. Thanks Rebecca :) I love to upcycle old things and make them new to me :)

      Delete
  3. I love how this came out so artsy and beachy!!

    ReplyDelete
  4. Amazing project. Love the before and after shot.

    ReplyDelete
  5. beautiful project!! love the color you have chosen...

    ReplyDelete
  6. Great job on your upcycle. It is your design so it fits you and its' new purpose. Thank you for sharing.

    ReplyDelete
  7. Great way to upcycle, Mandi! I'm always on the outlook for crafty project items at the thrift stores. Thanks for sharing this creative idea!

    ReplyDelete
  8. You're box is just lovely and would be perfect for one of your stamped stones!

    ReplyDelete
    Replies
    1. Ha thanks Mary Anne I did not even think of that! Maybe I will make a collection and keep them inside :)

      Delete
  9. Love your altered box! Great colors.

    ReplyDelete
  10. You did an amazing job altering this box! Very pretty!

    ReplyDelete
  11. Awesome box for oils, Mandi. It is beautiful and the price is just as nice. :)

    ReplyDelete

Post a Comment

Popular posts from this blog

Unity & Misti Blog Hop

Hello My lovelies :) Welcome to the Unity and Misti blog hop! I  hope you are enjoying seeing all of the projects so far. I just had my first wee play with the Misti tool the other day. It is a very new to me tool and wow do I LOVE it!! It is awesome! Just for the simplest of things like positioning a stamp.  One time is all you need with the Misti!! I am not one of those crafters that gets my stamped images crisp first time. I usually have wasted a card or two before I end up with a perfect image. This tool totally eliminates all of that.  Here is my very first card that I made with the Misti tool and Unity stamps.  I used a stamp called  Scattered Pieces . I LOVE this stamp and the sentiments that come with it.  I positioned the feather and the sentiment at the same time on the Misti.  I totally love that you can do that too!  It lets you stamp several at once instead of just eye balling it and hoping it works out!

Craft Stamper November Challenge

Hey Friends Welcome to a new  Craft Stamper  challenge for November. Can you believe we are almost at the end of the year already!!  Where did time go?? It has been pretty cold and frosty up here in Scotland for the last few nights.   But I am hanging on to Autumn as long as I can. I took a wee walk around the park and collected some lovely Autumn leaves.  I wanted to incorporate them into my project today.  I put the leaves in some paper and put them inside a heavy book overnight to press them down.  I started off with a white card base and used this sentiment stamp from Unity and repeat stamped all down the side of my card using Potting Soil Archival Ink. Then I went around the edges with Fossilized Amber Distress Oxide Ink.  Next I took my leaves and my paper punches and punched a heart shape out from the yellow leaf and then stuck it to my card with fabric glue.  Then I punched some hearts from the red leaves and put one inside t

Weeds N Wishes GIU Day 1

Hello Friends Welcome to my first day of my first ever GIU week yay!! I am super excited to be showing you my creations this week with the wonderful Unity stamps :)  I only found out last week I would be the GIU girl this week. I had to switch out my Dec date as I will be in Scotland another yay :) I have two cards for you today with this new stamp set from Unity. I absolutely LOVE dandelions. So when I saw this set I just had to have it. It is called Wish With Your Heart and it is on sale right now for $12 a bargain. I think today is the last day of the sale so if you like it go and grab it quick!! So for my first card I wanted to do another black and white card. I also wanted to use my black distress ink which I bought months ago and have never used. It is called Black Soot and funnily enough it gets everywhere just like the real black soot. I love getting messy with my distress inks and kind of expect a bit of a mess. But the black mixed with water gets EVE